Last night, on In World Review, a major topic of discussion was how horrendously difficult Blender is to use. You can’t just install it and start playing around.
I tried, and it almost killed me. No obvious mouse gestures work. The menus don’t make sense. In fact, there are three different “View” menus on the home screen!
For example, one of the things we all would have liked to be able to do was to take an existing mesh and just tweak it a little bit. How hard can that be? I finally had to throw in the towel at 4 a.m. last night — I couldn’t even get as far as getting the mesh into Blender in a recognizable way.
But I’m not a quitter.
Today, I tried again, and again, and again, working through multiple tutorials, Googling around for the commands — did you know that keys have different effects based on where your mouse is hovering on the screen? — until I finally was able to take a public mesh, bring it in-world, edit it, export it, and successfully bring it into OpenSim and apply a texture to it.
Here’s what I did, and I hope this will save some people the two days I spent figuring it out!
1. Download and configure Blender
If you just download Blender, install it, and run it, expecting it to just work — ha ha ha ha! No. It won’t work. Because it’s designed by crazy people for professional designers who don’t want amateurs like us to be able to edit mesh — otherwise, they’d be out of work. Â Like all those people who used to retouch photos for a living.
Eventually, as more regular people starting wanting to do stuff in 3D, we’ll get more user-friendly tools.
Until then, here’s a quick summary of what you need to do the first time you use Blender:
- Download and install latest version of Blender. It’s free!
- Click on the “File” menu on top left, select “User Preferences” and click on the “Left” button under “Select With.”
- Now click on everything you see in the middle of the screen — the box, the light source, the weird do-hickey — and hit the “Delete” key. It’s just junk.
- Click on the “View button” at the bottom left of screen, and select “View Perp/Ortho.” This will change the “User Persp” label at the top left of the screen to “User Ortho.”
- Click on the “Blender Render” button at the top of the screen, in the center, and pick “Cycles Render” from the drop-down menu.
- Finally, go back to the “File” menu, and click on “Save Startup File.”

If you want to know what all that did, you can read Aine Caoimhe excellent and detailed explanation here. Or you can take my word for it that, until I did all that, Blender was completely unusable, and after I did it, things started to work!
2. Import your first mesh
For a starting mesh, I wanted something simple that I could play with, and that was licensed CC0, in case I created something that I could sell and get rich off of. A girl can dream!
So I went to Fred Beckhusen’s– a.k.a. Ferd Frederix — amazing Outworldz site and downloaded a CC0-licensed wood fence, because I heard that landscaping supplies were the big sellers on the Kitely Market. I unzipped the download, and saw that one of the files had a .DAE extention — that’s the Collada format that OpenSim users.
Then I clicked on File>Import>Collada (Default) (.dae), navigated through Blender’s really horrible file selector, found the file, and clicked on “Import COLLADA” at the top right.

There was my fence — so tiny and puny.
3. Look at your mesh and move it around
Building in Blender is almost, but not quite exactly, unlike the building controls in OpenSim. There are some overlaps, just enough to give you hope that you can actually do something — but then the differences are major, and will destroy your soul if you’re not careful to take regular breaks to swear and kick things.
Here are the main camera controls I finally figured out how to use:
- The mouse wheel zooms in and out.
- Click on the middle mouse button and move the mouse to swing the camera around. In my case, that meant clicking on the mouse wheel itself. I didn’t know it could do that!
- To move the camera sideways or up and down, hold the Shift key while clicking the middle button and moving the mouse.
- Or hold down the Shift key and use the scroll wheel to move the camera up and down, and the Ctrl key and the scroll wheel to move the camera right and left.
- Finally – and this really helped me a lot — the “View” menu at the bottom left has a “Front” option under “Cameras.” Clicking on it will automatically put the camera right in front of the object. Handy!
The fence itself is made of four separate pieces — the three horizontal beams and the vertical post. I click directly on a piece to select it, then used the arrows to drag it around — a lot like in OpenSim.
You can read more about different movement and camera controls on Aine Caoimhe’s follow-up tutorial.
I decided to add a new horizontal stick to the fence, by duplicating the top one. I clicked on the top one. Then I clicked on the “Duplicate” button on the left, under the “Edit” menu. But you can click Shift-D instead — if you forget the shortcut, you can mouse over the “Duplicate” button and it tells you.
I moved the other sticks up and down a bit to space them out nicely.

4. Edit the mesh
Next, IÂ decided to actually edit one of the sticks to put a little bit more of a bend in it.
To do this, you need to select the stick you’ll be working on by clicking on it. Then switch into “Edit Mode.”
You can do this by clicking on the “Object Mode” button at the bottom of the screen and picking “Edit Mode” from the pop-up menu. That’s what I was doing at first, but you have to go back to “Object Mode” in order to move your camera around, and switching back and forth gets annoying if you have to pull up the menu each time. Fortunately, there’s another short-cut — the Tab key switches you from one mode to other.
Would I have known how to do this by playing around with Blender on my own? No! It makes no sense! Arrgh! It took hours to figure this out! I had to keep Googling it and looking at documentation that was totally useless! Okay, now that’s off my chest…
Here’s the main things I learned from playing around with the mesh on this and another object:
- Everything is made out of triangles. The points on the triangles are called “vertices.” While in “Edit Mode,” click on one of these vertices and use the arrows to move it around.
- To select more than one vertex, Shift-click.
- To delete vertices, hit the “Delete” key. You can delete several at once if several are selected.
- To combine two vertices, you’ll need the “Merge” button — it’s in the left-side tool bar. There’s a lot of stuff in there — on my screen, I actually had to scroll down to get to the “Merge” button, which is in the “Remove:” section under “Mesh Tools.” If you can’t find it, it’s also in the “Mesh” menu at the bottom of the screen, just to the left of the “Edit Mode” button. Click on Mesh>Vertices>Merge. You need to have two vertices already selected to use this, and you will need to decide whether you want to pull the second vertice towards the first one, pull the first one towards the second one, or meet in the middle. Merge>At First, Merge>At Last, or Merge>At Center.

I didn’t actually merge any vertices on this particular object — I just moved a section up a little bit on one of the horizontal beams. I had to swing my camera around to the back, to get the vertices I couldn’t see from the front.
There’s also a bunch of commands to subdivide and deform vertices, but that seemed like an advanced step. Maybe for a future day.
5. Get it from Blender to OpenSim
Now to get my new, four-beam fence into my world.
The main command is File>Export>Collada (default) (.dae).
The first time I did this though, I only had one of the beams selected — and I wound importing a single stick into OpenSim! Ooops! It took a few tries, but I finally go it. In “Object Mode,” there’s a “Select” menu at the bottom left. Clicking Select>Select All by Type>Mesh selected everything.
Then in File>Export>Collada (default) (.dae), there are a whole bunch of options. Following more of Aine Caoimhe’s advice, I checked the following:
- Apply Modifiers (View)
- Selection Only
- Only Selected UV Map
- Include UV Textures
- Copy
- Triangulate
- Sort by Object Name
- And – why not? — Export for OpenSim
In other words, I checked everything except “Deform bones only.”
Then I found the folder where I wanted to save it, typed it a new file name, and clicked on “Export COLLADA” at the top right.
Now, over to OpenSim!
To import the mesh, go to Build>Upload>Mesh Model then choose the file. Type in a new name for the object — for some reason, it doesn’t just use the file name.
Click on “Calculate weights & fee†at bottom left of the Upload Model dialog window, then click on “Upload.†The mesh is now in your inventory.
Rez it on the ground, and stretch it out and position it the way you would any object in OpenSim.
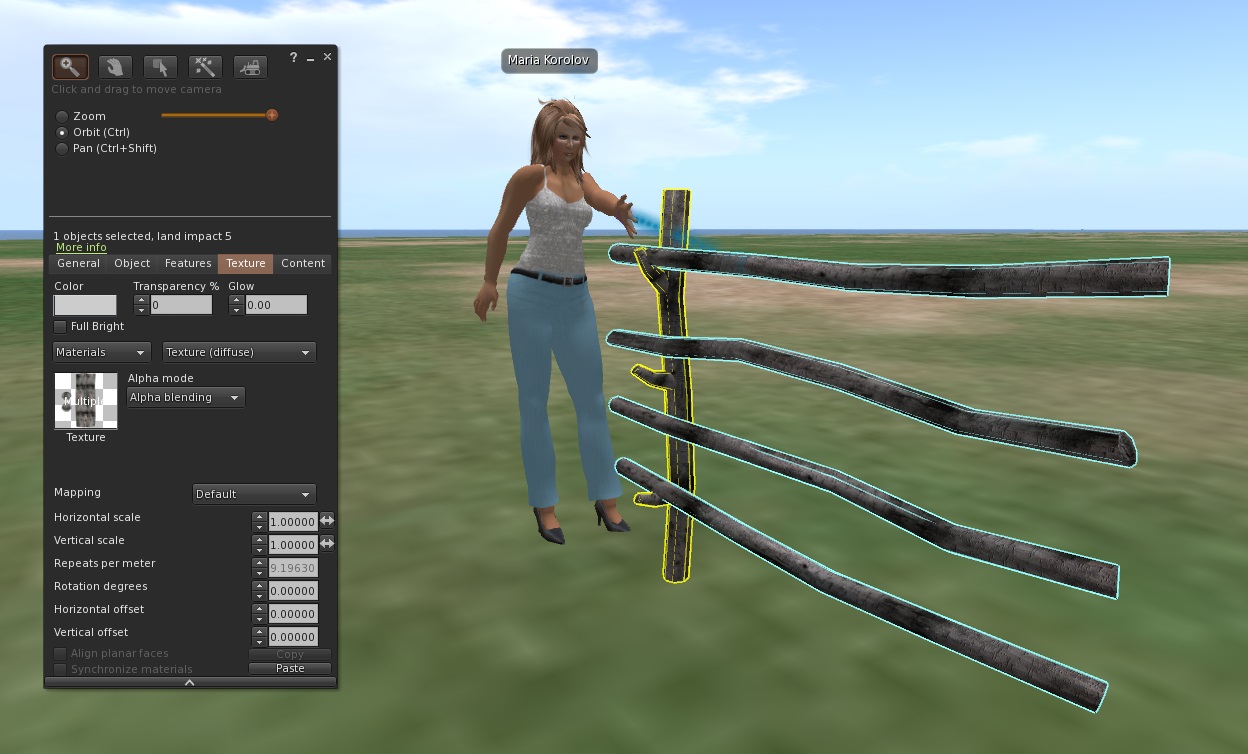
Now, when I first rezzed it, it didn’t look particularly special — it was just white. That’s when I remembered the texture files that were in the zipped download. One texture file was for the horizontal beams, one for the vertical. I uploaded the images, and applied the textures.
Each of the parts turned out to be a separate item, all linked together into one object.
But then I looked around at the fence from the back and I noticed the little supporting branch stubs. There are only three little stubs — it looks like the middle two cross beams are just hanging in the air! I didn’t notice this when I was editing in Blender.
Nobody’s going to pay money for this fence now!
On the other hand, having gone through all this, I am now willing to pay anything — anything, I say! — for mesh objects designed by other people.
I only have one major regret. Over the past couple of days, I’ve tried everything I could think of to edit one of Damien Fate’s excellent mesh clothing templates, which are rigged so that the mesh clothing moves with your body. But during the process of importing them into Blender, editing the mesh, and exporting it again, somehow the rigging got lost and all I would up with in OpenSim was a useless — and super-tiny — shirt-shaped object.
Does anyone have any advice on editing and imported previously-rigged mesh? Trying to figure this out on my own is killing me.

- OSgrid back online after extended maintenance - April 16, 2025
- Analysts predict drop in headset sales this year - March 25, 2025
- OSgrid enters immediate long-term maintenance - March 5, 2025